I am a science geek at heart. I love how many different things fall under the subject of science. There are so many different things you can study and learn about when it comes to science. Even when I was young, I wanted to find out how things worked or the science behind different things in the world. One of the best parts about science are the experiments!
Kids can learn a scientific concept but when they see that concept in action, they will have more understanding of how it works. I also have had fun using science experiments in my object lessons when I teach children’s church. I have a favorite site called madaboutJesus.net . They have excellent science experiments for many different lessons in the Bible. I have found out that its important especially if you are demonstrating the experiment, to try it out first on your own. There are usually tweaks that need to happen to get the desired result. All my kids love to do science experiments, but sometimes there are certain experiments that have a “wow” factor for the kids. I like to randomly do some of these experiments just to get the kids excited about science or to start a discussion on why the experiment did what it did. Here are 3 experiments that have been exciting to my kids….
- Elephant Toothpaste
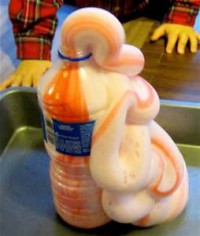
Elephant Toothpaste is an all time favorite with my kids. It has quite a chemical reaction that is fun to watch.
Materials: –16oz or 24oz empty plastic bottle, hydrogen peroxide 6% (you can find this at your local beauty supply store), dish soap, yeast, warm water, food coloring (optional)
Elephant Toothpaste is a common scientific experiment where oxygen gas produces the release of oxygen in a form that we can visualize. The final product (visualization after mixing the ingredients together) appears as a thick foam that looks like a toothpaste. This is a messy experiment that you would want to do outside or we bought one of those tin foil baking dishes that caught all the foam.
How to make Elephant Toothpaste:
Take the package of yeast and mix it with half a cup of warm water. Let this sit for 10 minutes. If you don’t let the yeast sit, the experiment will have less of a reaction. Meanwhile set the empty plastic bottle in a wide short glass to stabilize it. I have found this to be helpful in not having the bottle tip over when you get the chemical reaction. Put on a pair of plastic gloves and fill the bottle up with 8oz of hydrogen peroxide. If you are using 6% or more for the hydrogen peroxide, you will want to wear gloves because the peroxide can burn your skin and turn it black. I don’t let kids do this part, I do the pouring and wear the gloves just to be safe. Next put a couple of tablespoons of dish soap in to the bottle and carefully mix the two ingeridents. Now pour the yeast in and watch the elephant toothpaste emerge from the bottle. Its quite a reaction. You can add the food coloring right before the yeast if you want your toothpaste to be a different color.
Tips/Tricks:
If you want a bigger chemical reaction you can buy a stronger hydrogen peroxide at most beauty supply stores. We did 9% and 12% strength. The 9% was about perfect for indoors but any higher percent and you would want to be outdoors. If you do use the stronger hydrogen peroxide don’t forget the gloves! You do not want your fingers turning black. Another helpful hint is to use a funnel when pouring ingredients into the bottle. If you use just 3% hydrogen peroxide, you will still get a reaction just not as impressive. Check out Elephant Toothpaste experiment demonstrated on youtube to give you a better visual of what its supposed to look like.
2. Crushed Can Experiment
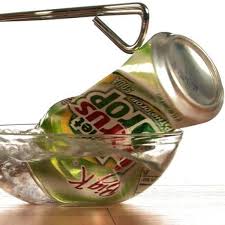
This experiment has an immediate reaction of letting the pressure of air crush a can. Air pressure is all around us but we don’t really notice it most of the time. This experiment demonstrates how powerful air pressure can be.
Materials:
Empty soda can, stove top or hot plate, Cooking tongs, gloves, Bowl, cold water
Directions:
Put some really cold water in a medium or large bowl (I used a mixing bowl). Then put about a tablespoon of water in the bottom of the empty soda can just to cover the bottom of the can. Put the can on the stove (you can use a frying pan underneath if you don’t have a hot plate) and then turn on the stove. Wait until the water is boiling in the can. You will hear it boiling and see the water vapor rising. Wait about 1 more minute, then grab the tongs. Use the tongs to pick up the can and plunge it upside down in the cold water. The can will immediately implode. Steve Spangler Science does a great job of explaining the science behind the crushed can on their website.
3. Walking on Eggs

You can walk on eggs without them breaking. This has a “wow” factor because the kids don’t think that you can. The first thing you do is try to walk on one egg and it will crush right away, but you can walk on eggs if they are all together in a dozen in the carton. I ripped off the lid of the egg carton and staggered 6 dozen eggs. A key to getting it to work the best is to go bare foot and to make sure your weight is even. You can also show your kids when you squeeze an egg sideways as hard as you want, it will not break. The egg is unique in how God made it because its one of most delicate foods, but also one of the strongest. The egg will break by itself but when you put it with the dozen, you can walk on them and not have any break. This is also a great Sunday School lesson on unity and working together. You can find many examples and tips on how to walk on eggs on youtube.
Hope you have fun trying these experiments. There are many more science experiments that are fun for kids to do that have become favorites in my family. I hope to share more science experiments in the future that you might have fun trying.
What are some favorite science experiments in your homeschool?
