As we are about to start our new homeschool year, I start to think about what kind of teacher planner I want for the year. We homeschool year around but our new school year still starts in September. Some homeschoolers use teacher planners to organize their days and keep track of where they’re at with each of their children. Some homeschoolers do not see the need for a planner especially if their kids are younger. I am definitely in the first category. I love planners and seeing where I am at or how much I have gotten done. A planner helps me see the gaps on things that I might be not getting to and might need more attention. Here are 3 teacher planners that I think are excellent choices for homeschoolers.
1. My Well Planned Day

I have used this planner for many of my years of homeschooling. I love how it is made for homeschoolers. There are sections for keeping book lists and field trips that you plan for each month. I think my favorite feature is how the planner caters to teaching multiple children. One of the most important features I look for is whether I will be able to use it with multiple children because of the 5 children in our house. There is also a section for planning out your meals and inspirational articles to encourage you in your journey of homeschooling. The price point is also quite good at $26.95 for the planner. You can find it at headua.com or christianbook.com. They also have an online version planner that is an option on the website called mywellplannedday.com. The online version is offering a 30 day free trial if you want to check it out. I prefer the paper and pencil method but if you like the tech version for things, it may be worth checking out.
2. Teacher Planner by Erin Condren
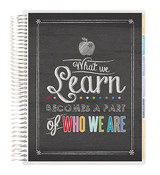
What attracted me to the Erin Condren Planner were the lesson pages. I love the amount of room in the lesson pages that allows me to fit multiple children. Erin Condren teacher planners are unique because you can customize them in many different ways. For example, if your homeschool has a name, you can put that on the front cover. She also has many other different unique options that you can add to your planner. One of favorites was the snap in sticky notes. She created a plastic insert that has multiple sticky notes that can snap into you planner on the pages your doing your lesson plan. I take numerous notes about ideas that I have for each of my lessons so this was a nice feature for my planning pages. She also has these amazing inspirational quotes throughout the planner. Erin Condren Planners are not made for homeschoolers so there are pages that do not apply to homeschoolers. There are blogs and youtube videos that homeschoolers have made on showing how they adapted and repurposed those pages to work for homeschoolers. The price point for this planner is quite a bit more money. You would have to decide if the customizable planner was worth the money. Erin Condren planners are about $59. I have done the free planners that you print off online and by the time the year is up, I have spent almost that same amount in ink on the free planner from online. Its a well thought out planner worth checking out. You can find it at erincondren.com.
3. Notebook Paper, Pen and A Binder

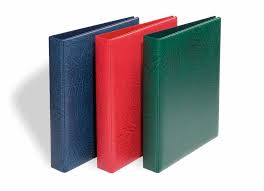
Okay, you are probably going to laugh, but the last “planner” that I recommend is notebook paper, a pencil, and a couple of binders. I have a child in highschool this year and I have found, in all the planners that I have researched or tried, that there is not enough room for me to write out each of the details for his assignments. He is more of an independent learner at this point and I need to communicate in writing to him what each task is about. I have two binders for my highschooler. One of the binders is a small thin binder with notebook paper that I write out his daily assignments with check boxes. The other binder is a 3 inch binder that I have dividers in for each subject and important information I keep that are required by state law for his high school records. Every time he hands in an assignment, I put it in the binder under that subject. I love the idea of the binder keeping his assignments because I can look at the binder and see where there are gaps. For example, if my science section is full of assignments but my fine arts sections is empty, I can see right away that I need to put some focus on fine arts to add to his high school records. Lee Binz calls this method of keeping records being a “Binder Queen”. One of the best things about doing planning this way is the price. It does not cost much to buy a couple of binders, notebook paper and some pens. I use the teacher planner for my 3 younger kids and the notebook paper for my highschooler. Even in teacher planners I am eclectic.
A Couple of Helpful Hints for Using Teaching Planners-
- When using a planner for multiple children, a creative way to help with that is using different colored pens for each child’s assignments so you can clearly see who is doing what.
- You can use a highlighter after the child completes an assignment to show that what they have accomplished and what they still need to get done.
Hope you have an amazing start to your new school year!
